Sunday, May 30, 2010

Trash Bag Wreath, The Details

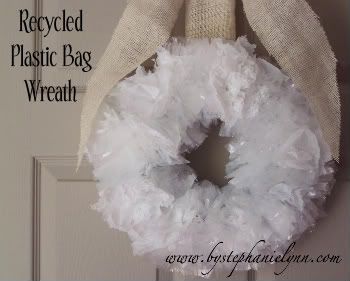
Stephanie at Under the Table and Dreaming, had this fabulous idea, to make a wreath out of trash bags. What a wonderful idea to recycle some things from your home and make something decorative.

Though, the name of the wreath is not quite attractive, I had to check it out.


Here is her's, and I  love it.

I think, though, once you read my blog, that I "re-invent" the ideas of my fellow bloggers and throw my little twist into the mix. Normally, because I do not have exactly what they used, nor do I want to load up the car with the kiddos and head to the local craft mall and get two things.

So here is my twist:


I started with the styrofoam 12 in wreath
hot glue
screw driver/ knife
trashbags, clear & white

We do not have a ton of extra trash bags lying around, so I bought some from the store. The cheap ones, this total project cost about $5!

I folded the bags three times, due to the length and the fact that I wanted a full wreath!

Hot glued the ends together and then clothes pinned them, I hate sitting around waiting for the glue to cool!

This worked better and made it go faster. I did about 15-20 bags, but needed more, so total bags ran about 30-45, but remember I want FLUFFY!


I started with the screw driver to make the holes, but wanted to make sure the bags were in there good, so I used a steak knife to dig out the hole and filled it with glue and pressed the glued end of the bag instead, making sure I had all the edges inside, so they would not fall out later.


This is what I got! I rotated two white bags per one clear bag.

The clear bags were longer and wider.


I cut the folded end with scissors and began fluffying them out, see the one I already fluffed, to make sure that I liked it.  Since, the clear bags were longer I cut off about 2 inches so that they were in uniform with the other bags!

Viola!

This is what I got.


I love the fullness and the price!

Here it is over the entry table, that I will re-do later. It kinda brightens it up some!

(I did not have the flash on though)


Love it! Love it!


Linking to:
Join us Saturdays at tatertotsandjello.com for the weekend wrap up party!

UndertheTableandDreaming

Photobucket

Wednesday, May 26, 2010

Little Blue Chair Update!


My original post about my little blue chair.

$3 garage sale STEAL, I knew it had to come home with me.

Here it is before:


And after....


Spray paint all the way!

After sanding and sanding and stripping and sanding.

And when I thought I was done with sanding I would take a once over and realize one more sanding would do.

I slapped Cappuccino on top with a clear glass and
VIOLA!


Linking to:

Furniture Feature Fridays


Visit thecsiproject.com
Furniture Feature Fridays

Saturday, May 22, 2010

A Day at the Lake


I used this paint for our Master bedroom and love the deep brown it gives out.

There was a 40% discount at the fabric store on all fabrics and trim, so this tassel trimming was a steal. Plus, it would go great with the brown. Right?!

The difference with this tassel is the bird house is round, first of all.

Which to me seems different so I wanted something different. So I fluffed the bottom and wrapped a piece of burlap around it, like a skirt.

Then I threw in the frilly things. The house is simple, not too much.

I just did not see a lot of frill with this one.

More Simple.


Tuesday, May 18, 2010

Beach Bird House Tassel


I love this one!!!

If I was a bird I would so call this house for reservations every weekend and camp out there.

I thought the house kinda look like a church and then maybe a house in the Hamptons. Like I know what those look like.

I'm guessing here.

So I gave it that antique white color of paint.


Let the fluffing begin. With some accessorizing.


Viola!

By far one of my favorites and I made 4 of these today, The more I did the better I got.

And, the little blur through out the pictures, is Woody from Toy Story, he goes with us everywhere and just needed his picture taken with the tassel.

Sunday, May 16, 2010

Another Tassel


Just Because I Can.

Friday, May 14, 2010

Wreath with Your Coffee


So, let me start by saying I love wreaths.

I am one of those people, that changes it for every season on our front door and I even made every one of those. When we first moved into our home as newlyweds I put a store bought one on EVERY door.

However I have grown tired of the store bought look and have fallen in love with the handmade wreaths I have been falling upon in the blog world.

If the wreath makes me swoon, I will make it.

As did this wreath over at The Little Brown House.

I love her ideas and just HAD TO HAVE THIS WREATH!


I did throw my little twist into the mix though. She used safety pins and with two lil' ones in the house, I did not feel safe doing that. So I hot glued my hiney off.

I also liked the flower idea and wanted something shiney in the middle.

So I grab an old pair of earrings I NEVER wear and glued it in the center too.


In case you were wondering this entire project cost $5!

Linking Up to:

Photobucket

giveaways


Get your craft on Thurs.
HookingupwithHoH

Wednesday, May 12, 2010

Sneak Peak!!!!!


I just could not pass up the uniqueness in this piece.

Though it may not be the greatess looking, right now.

But it will be.


Monday, May 10, 2010

Tassel Me...


Just in case there is another Tassel Party over at The Nester, I will be ready.

Plus, the creative juices were flowing and once they start I just can't stop.

I was not really buying this candle stick holder for a topper, I thought it was cute and maybe I could put it in my china cabinet or something.

But the brass had to go.


I got this new spray paint and wanted to try out the color and what better way then to paint something that I did not like the color of.

Two coats and I think it covered it nicely.

Will I have been out stalking reading about all these tassel makers, I thought I could do that. I was also very attracted to the idea of using burlap.

I just like it.

So here we go.

Started with the painted holder. Don't you love the work station, my dining room table with a blanket so I can watch the kiddos while I work.

Multi-tasking!


I knew that with a topped like this, I would need something fluffy, so I whipped out the ole tulle.


Then cut some burlap and fastened the ends together to form loops.

However I was not to thrilled about the outcome.


So I cut the loops.


Then, added some ribbon.


I gathered another thickness of ribbon, as well as a color I liked and hot glued it into the holder, to form the hanger.


I was going for country cottage meets wedding on a Sunday.


I think I got it!

I'm also participating in


DIY Day @ ASPTL